Different Software to use for video presentations
- There are many programs you could use for video editing;
- Some are better some are worst, some are cheaper some are expensive and some are free;
- But the only thing that truly matters is your experience it is best to start with the basic edition of a program get used to it, and then move on to more advanced editions of that software. Why is it best to stick with one software, because that way you will be able to create video presentations faster and more protectively.
Choosing the software that is right for you
- Although there are many video presentation programs out there and they keep being updated almost every day, you must choose the one that you think you will feel most comfortable with.
- Don’t buy a program just because it was recommended by really experienced professionals on a blog, you might not yet have enough knowledge to use the software they recommended. Buy a simple one for beginners.
- Another important point is how old is the soft, if it was released five days ago don’t make the mistake of buying it just because it has the newest tricks and a really user friendly interface, if the program was just released it will have a lot errors in it which will most likely stop you from making a good video presentation. Get software that was released about one year ago or so that way you get all the support needed.
Why some are better than the others
When you pick out a software that you want to use for video presentations, you must consider a number of things:
- How advanced are you, will the interface fit your abilities;
- Know what file formats you want to be using, and then make sure the software can handle that exact format;
- How many tracks does the software support.
Free online software
- You can easily create a video presentation for free online;
- Sign up at http://www.prezi.com and you will be able to create presentation with tweaks that not even some video editors have.
Tactics to use the software to make your presentations more enjoyable
- Add in a little humor animations in your slides, but make sure that they mix with the rest of your presentation;
- Some music before and after the presentation is always nice, for example some music when everyone comes inside and some music at the end of the presentation with the credits.
Study the group that will listen to you
- Knowledge level, attitude – toward the subject, needs, gender, age, culture, native language;
- It is very important to know your audience since they are the ones that will be listening to you. Although this seems obvious many people forget about the fact that they are presenting to someone else not to themselves and they pick templates, music and other things as such, for their tastes.
How long should your presentation be
- Your presentations should not be too long so that everyone would fall asleep while listening to you and it should not be so short so that no-one would understand who you are and what you want from them. The presentation should be long enough to bring out your point, send it over to the audience. In other words it could be 15 minutes or 30 minutes, but no more than 45 minutes, if your presentation is longer than 45 minutes you should have at least one break to let the audience relax.
Prepare the necessary equipment
- Having working equipment will make your video presentations go smoothly. Before you present your work, ensure that all the necessary equipment is available, set up correctly and working. You should run through your presentation to see how it looks overall and to fix any problems. If you are not overly familiar with the media or equipment, make your presentation simple to avoid technical complications.
What is Windows Movie Maker
Windows Movie Maker is a video editing software that comes preinstalled on any windows operating system. Windows Movie Maker is a simple video editing software, but it has what is needed to create a video;
How to create a video in Movie Maker
To create a video you have to follow these steps:
- Import media: static pictures, video, and audio;
- Arrange the media on the timeline the way you want it t be displayed, and do some basic edits such as trimming the video clips or adding effects;
- Add titles to your video, credits at the end and a introduction in the beginning;
- Watch your video and look for the minor mistakes you made, and finally save the video;
How to use Movie Maker
You can import your media by clicking the “Import (video, pictures, audio or music)” links. After you click one of them this window will appear.
To add video effects go to the “Video Effects” link in the left hand side. To apply the video effect drag and drop the effect in the timeline.

To add video transitions go to the “Video Transitions” link on the left hand side. To apply video transitions drag and drop them on the timeline.
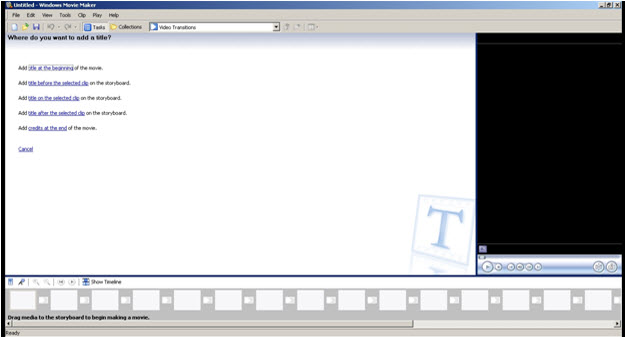
 To add titles and credits click the “Make titles and credits” link on the left hand side. After you click the link this window will appear, here you can add a title : at the beginning, the end, of the movie, or before the selected clip, after the selected clip, or on the selected clip.
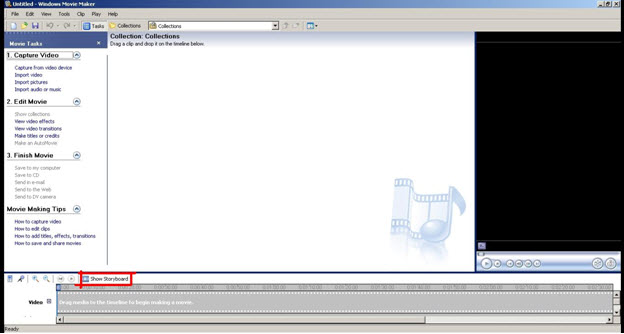
 By clicking “Show Timeline” you will be able to trim and edit the pictures, video-clips, video effects and transition, and titles on the timeline.
 To finish the movie you will have to save the video file , you can save the video as a movie file or as a project file. If you save it as a project file you will be able to edit it in the future, but if you save it as a movie file you will not be able to make any changes. It is best to save the video file in both formats.
There are many options in which you could save the video file, you could save it on the computer, on a CD, send it to e-mail, or send it to web.


Comments
There are no comments on this entry.