How to use PowerPoint
PowerPoint is a software program to enhance your oral presentation and to keep the audience focused on your subject. It operates like an old-fashioned slide show, but uses modern technology in the form of computers and digital projectors rather than a slide projector of old.
Each page in a PowerPoint presentation is called a slide. PowerPoint presentations run just like the slide shows of old, only they are broadcast through a computer instead of a slide projector, this kind of presentation gives the possibility to focus on the main idea and successfully promote it online.
Slide Layouts and Slide Types in PowerPoint 2007
Different Ways to View PowerPoint 2007 Slides
- PowerPoint has several different views to look at your slides. You can see each slide on its own page, or as several thumbnail versions of the slides in Slide Sorter view. Notes pages offers a place to add speaker notes below the slide, for the presenter’s eyes only.
Background Colors and Graphics in PowerPoint 2007
- The only reason I can think of, to keep your slides plain white, is for printing purposes, and there are ways to get around that. Add some color to the background to jazz it up a little.
Design Themes in PowerPoint 2007
- Design themes are a new addition to PowerPoint 2007. They work in a similar way as the design templates in earlier versions of PowerPoint. A really nice feature of the design themes is that you can immediately see the effect reflected on your slides, before committing to a decision.
- Pictures and graphics are a big part of any PowerPoint presentation. They can be added using the icon on the content layout slide types or simply by using the Insert tab on the ribbon.
- Sometimes you like the look of the slide, but things are just not in the right places. Moving and resizing slide items is just a matter of clicking and dragging the mouse.
Add Clip Art or Pictures to PowerPoint 2007 Slides
Modifying Slide Layouts in PowerPoint 2007
How to create a PowerPoint presentation
1. Open Microsoft PowerPoint. The first item presented is a slide. It contains a title (large box) and subtitle (smaller box) section.
2. Type “The First Presentation” in the “Title” section. Under it–the “Subtitle” section–type your name. This is the first slide of the presentation.
3. Insert an additional slide with the “Title and Content” layout. As an example, type “Buy a Car” in the “Title” section. Type “Finance” and “Size” in the “Content” section. After each topic in the “Content” section, hit the “Enter” key. This ensures that each topic has a bullet point.
4. Insert a new slide with the “Title and Content” layout. In the “Title” section, type “Finance.” Click in the “Content” section and go to “Insert” and “Clip Art.” Double-click on any picture of money to insert it into the slide.
5. Insert another slide with the “Comparison” layout. Type “Size” in the “Title” section. Type “Large” in the left heading title and “Small” in the right heading title. Under each section, type the benefits of having a large car as compared to a small car.
6. Press the F5 key to view the presentation, which PowerPoint also calls the “Slide Show.” Press the down arrow key to advance to the next slide.
What is iSpring and How to Convert PPT to Flash
Sometimes you want to have your presentation in flash which is actually quite easy all you have to do is download for free the iSpring converter which will make your PPT file in a flash file so you could upload it online and run it from any computer that does not have power point. Here is a tutorial on how to install iSpring and convert a PPT file to a SWF file.
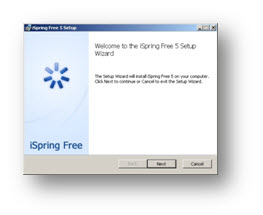
After you download iSpring and run the installer this window should come out. Here click “Next”.
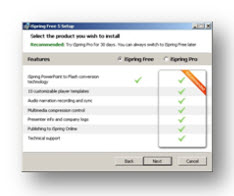
 For the free version select iSpring Free and click “Next”.
Read and agree the License Agreement and click “Next”.
Select your destination (where you would like for the program to be installed) folder and click “Next”.
Click “Install” for the installer to start.
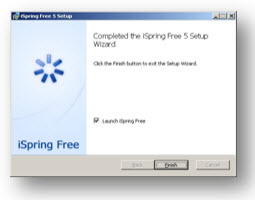
When the installer finishes click “Finish” to finalize the installation and run iSpirng.
To open iSpring click on the iSpring tab in your PowerPoint window.
To open iSpring click on the iSpring tab in your PowerPoint window. Click the Publish icon in the left hand side to start converting.
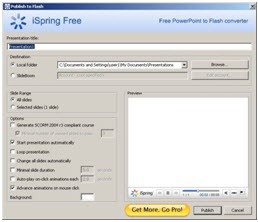
This window will come out; here you can set the designated location folder and other options. When you are done click “Publish” and you PowerPoint will be converted in flash.






Comments
There are no comments on this entry.