Before you start it is great to have the raw footage. The raw footage could either be picture or videos YOU took. If you do not have any raw footage you might be able to find something on websites such as http://www.flickr.com . Audio is very tricky to get since it is most of the time copyright protected. There are websites that provide non copyrighted music for presentations, for example http://www.danosongs.com
How to use Pinnacle Studio
Pinnacle Studio is quite easy to use since it has a very user friendly interface with many built in tricks with which you can make your video more enjoyable.
Pinnacle Studio Basics
The basics you need to know for any video editing software out there are:
- You will have the video tracks which will be at the bottom of the window;
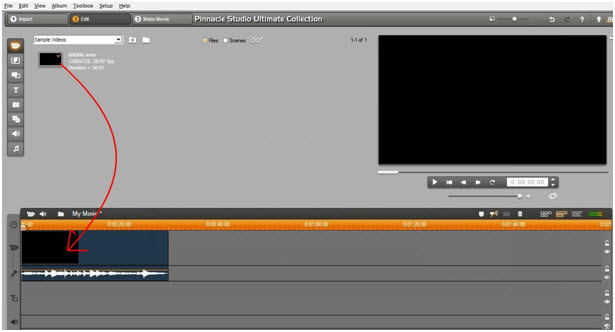
- In Pinnacle studio you will have the audio track, the video track and the title track. You can add a video track at any time easily but it is most of the time not necessary. In the Video track you can place all your raw footage, for example pictures, recordings. In the audio track you can add your own audio, or you can use the special Pinnacle studio audio tool. To add the audio just drag and drop it on the audio track. In the title track you can different text to you video;
- On the right hand side you will have the video itself so you can watch the changes once you make them;
- The largest part of the window will be where all of your raw data is located;
- On the left hand side you will see a box with a lot of icons in it those are the: Text, Effect, Audio, etc. icons.
For the Full Manual Visit: http://cdnexpress.pinnaclesys.com/akdlm/SupportFiles/Studio14_0/manuals/Studio14_0-us.pdf
How to create a video in Pinnacle Studio
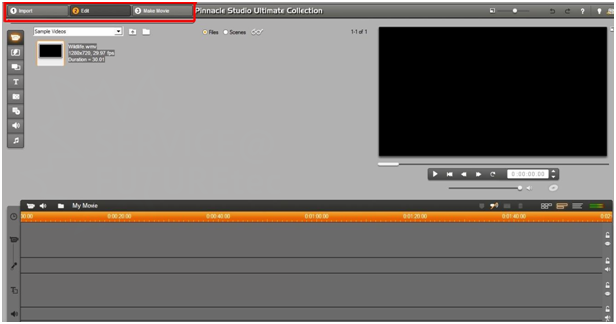
- In Pinnacle Studio you will have three different tabs: “Import” “Edit” “Make Movie”, these are the basic steps you will go through to create a video.
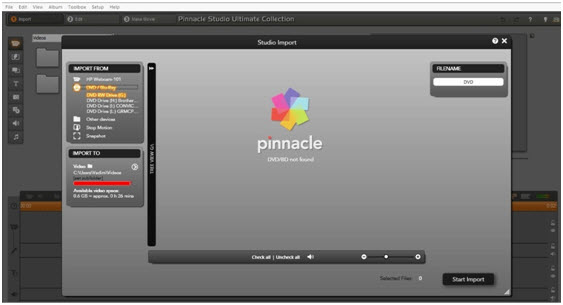
- With “Import” you will be able to bring your data from your hard drive, camera if connected, or any other removable device.
- After you import the video clips, pictures and/or audio, if any are required, you have to place them on the time line so that you could start editing them. You have to place the video clips and pictures on the video track, and the audio on the audio track.
- Pinnacle Studio also has a very useful tool, voice overlay. With voice overlay you can play some music in the background while the voice recording takes priority.
- A very good trick that a lot of people use in Pinnacle Studio is the second video track; with the second video track you can have two videos on the screen at the same time side by side. To add the second video track all you have to do is drag a video clip from the first video track and drop it below the first track.
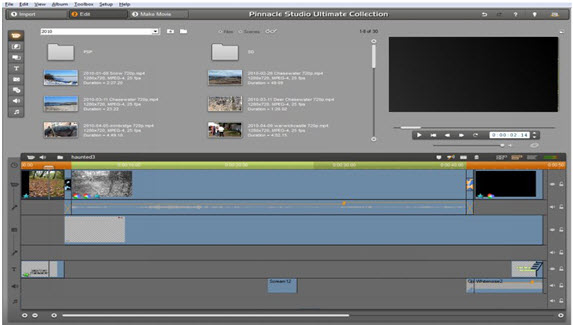
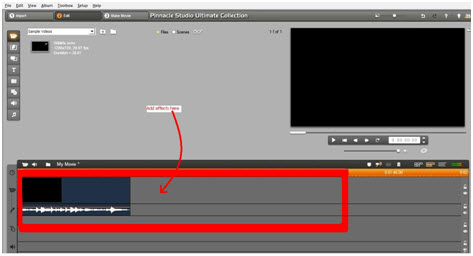 After you have all your tracks arranged on the timeline it is time to add effects and edit. You can trim your video clip or pictures so that they would be played for a shorter time, you can also add transitions between different video clips and pictures. To select the transitions you will have to go to the effects icon on the left hand side and pick which transition you would like to use. To apply the transition just drag and drop it on the video timeline wherever you would like for the effect to take place.
After you have edited your video, you have to save it, or “Make Movie”. With Pinnacle Studio you have many options as to where or in which format to save the video. The most common format in which most video files are saved is AVI. You can save the movie on your hard drive or if you choose you can save on it on a DVD or CD if available. If you choose to burn the video on a CD/DVD/BlueRay Pinnacle Studio will show you how much free space is left on the CD/DVD/BlueRay and how large is your video. There are many other formats you could choose to save your video in on your CD/DVD the higher the quality of the video the more space it is going to occupy. You can also promote your video and upload it to YouTube from Pinnacle Studio without saving the video on your hard drive, or CD/DVD/BlueRay.


Thanks for sharing your thoughts about make video. Regards